How to Map Processes
Introduction
In this How to Map Processes blog we teach you how to quickly create powerful process diagrams. This will help you:
- to align your workforce
- understand your company’s constraints
- identify vital improvement opportunities.
Everything we show you in this how to map processes guide can be done with paper and pens. Why not have a go and see how simple it is?
Why do we process map in the first place?
Business process mapping is used extensively across larger businesses throughout the world and more and more in small to medium sized businesses. Why? Process mapping helps people make sense of patterns of work that involve different people and different tools. Generally you’ll see process mapping in projects such as introducing new software to a business, reducing costs, saving time, improving quality and creating a better customer experience.
However, with advances in technology and changes to how people create and consume products and services, now even the smallest businesses are complex. Therefore even the smallest business needs to clearly understand its most important and valuable processes and learn how to map processes. Even more importantly they should also have the opportunity to understand and access process mapping tools, just like any large organisation.
In the following how to map processes guide we’ll show you a simple, yet incredibly powerful, approach to process mapping that anyone can do no matter how large or small your business is. What’s more, if you’re scaling up a business, the sooner you and your team start learning this valuable skill the faster you’ll be on your way to success.
Step 1 – Title and Scope
First things first, before you start any process mapping you must agree the title and scope of the process you are about to map. The title is generally the easy bit, what is the process that we are going to map? e.g. Sales Process, Marketing Process, or something even more specific like the Expenses Process. Whatever you decide, make sure you clearly indicate what the process is.
The slightly harder but very important part, is the Scope. By defining a Scope we are setting the boundaries for what we want to map. This helps to focus everyone and prevent the team talking about other areas that are not relevant… or ‘Out of Scope’.
To define the scope you need to think about what triggers this process to start in the first place and the final output of the process. The start and end points.
A pro tip here, you CANNOT simply write Start and End easy as that would be. This won’t tell you anything about the process and means it’s harder to stop people talking about areas out of scope.
Get Resources to Help You Get Started
Let’s look at an example
Let’s take the Sales Process. It’s different for different companies but here, the sales process starts when a new lead has been generated. So the trigger (Start) may be as simple as “New Lead”.
Remember, it’s not unusual to have multiple inputs, or triggers, to start a process. For example, leads may come from different sources so your inputs could be; “New Phone Lead”, “New Email Lead” and “New Web Form Lead”. This is especially useful if you manage them in different ways in the process. A New Phone Lead will probably start with a telephone conversation, where as an Email Lead may require you to arrange a call first.
The end of the process should deliver some sort of value, either to the customer or to the next process in the business. A good way to think about defining this final output is to think about what you would need to see in order to know, categorically, that the process was finished. So, if we continue with our Sales Process example we may expect this to only finish once an order has been placed. In which case the final output would be “Order Placed”, or “Signed Contract”. Just like the start point, there may well be multiple end points. Don’t worry about this. We know that not all leads will convert into sales so an alternative end point might be “No Sale” or “Sale Abandoned”.
These could be important outputs to know if in the future you want to investigate how you handle these leads. It will help you to understand how to map the process as well
Most importantly, don’t overthink it. It’s better to put something that looks roughly correct to start with you can always change it as you map out more of the process.
Step 2 – What happens? The key steps in your process map
Now it’s time to start mapping out the main steps of the process. The key activities, or tasks, that make up the process. These steps describe the work that actually happens whether it’s done by a human or a machine.
Pro tip – Always describe the steps of a process using Verb + Noun. They are activities so they should be described as actions, you are doing something to something. Some simple examples include:
- Create lead
- Register opportunity
- Raise invoice
- Submit purchase request
These all start with a verb. Following this simple rule makes it much easier for anyone to read and understand the process afterward.
Then as you map out a new process call out all the activities you can think of and add them as boxes. Often people use sticky notes if doing this on a whiteboard. If you are using Skore these are called What Boxes because they describe what happens.
When working in a group, throw up all the activities people can think of and sort them into the correct order.
You may end up with lots and lots of boxes on the page and that’s OK. Just go with it. You will quickly find that some steps are details which sit underneath others. Here you have a choice.; Either put all the detailed boxes into the process and create something that is very large and potentially difficult to read. Or you may group detailed steps together and create separate processes for them. In Skore you can create sub-processes easily that link to your high level process.
Want to learn more about process mapping styles and approaches? Read our guide here.
Step 3 – Why? / So That? The reason for doing the work
This may be one of the harder steps to master but is also the most valuable.
The purpose here is to think about the value that each step brings to the overall process. Every activity should deliver something, either physical, data, or a change of state.
This step helps you challenge thinking such as “we’ve always done it that way”. It helps people consider steps and suggest improvements. For example if these outputs form the handover from one person to another it helps everyone agree what that handover looks like.
Start working through each activity from the previous step and ask one or more of the following questions:
- Why do we do this activity?
- What do we have at the end of it?
- How do we know when it’s finished?
- What could we measure to ensure it has been completed?
- What do we need to start the next activity?
The output of each activity should become the input to the next. Once you have been through all the activities and added all the outputs the order of the steps will become even clearer. You may need to rearrange them to make sure.
Pro tip. Try to avoid using the past tense of the activity as your output. This is simply repeating the activity and adds little value to the diagram. If you really cannot think of a good output you can leave it blank, it’s telling you something about the step and might need more work to understand why there is no clear output. A really important part of understanding how to map a process is being clear about each step, input and output.
Sign Up for Free Mapping Resources
Step 4 – Who does it? The person that makes sure it happens
Now you should have a clear process with all the steps and outputs defined and in the correct order. The next step is to define who, or what, is doing each activity.
It’s recommended that you use roles or job titles to describe who does each step rather than individual’s names. This is because personnel may change or you may have multiple people working in the same role.
By this stage you will probably notice that you are repeating or iterating through the process. This is, in fact, deliberate. Every time you do this you’ll realise that someone will probably notice something missing or inaccurate. This part of process mapping means that your process becomes clearer and more accurate over time.
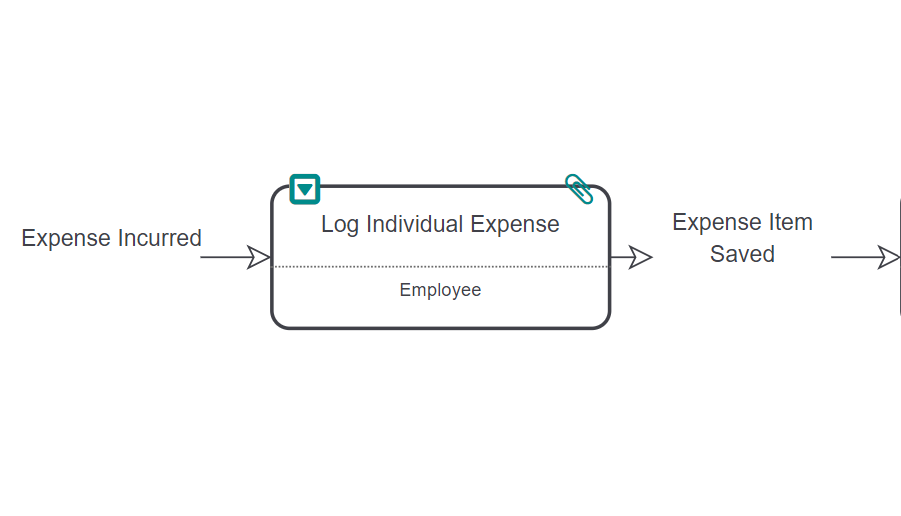
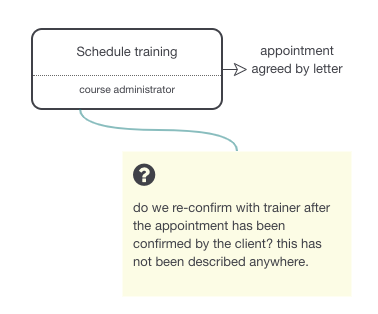
Step 5 – What else? Any additional information you need to capture.
Finally you get to this stage and it seems like the end is in sight. It is, but before you finish remember why you started this in the first place. It is vital to understand what the issues are and the opportunities to improve it. What you must make sure you do is capture these and you’ve probably been discussing them all the way through.
The trick here is to make a note of this information and make clear which part of the process it relates to. The simplest way is to annotate the process. You need to know how you will record this, it can quickly get messy and difficult to read. In Skore you can attach all these notes against the process in a clear and simple format. This allows you to capture information and report on them easily.
You also may want to reference other related information such as tools, documents, policies, templates and anything that’s relevant. Again annotate the process in your agreed format or use Skore to capture the relationship.
At last your process is complete. Remember however, that a process is a living and breathing thing and should be kept up to date as you make changes and improvements. The better documented the process the easier it will be to share with colleagues and get their feedback, thoughts and ideas.
How to map processes- which process do I start with?
So now you know how to map a process the question is which process do you start with? If you’re a growing business looking to build discipline around your processes so that you can scale effectively we recommend looking at our free Business on a Page template. This one page exercise helps you identify key processes and discuss which ones to start with. Once downloaded you can get going with your new found mapping skills.
And Finally
Remember – whatever anyone may tell you – you only need a pen and piece of paper to map out a simple process. You don’t need to be an expert in BPMN or a master of a drawing software tool. Anyone can learn how to map a process easily. Take back control and learn to how to map a process in your organisation, it’s a vital skill you won’t regret learning.
Skore is the Process Mapping and Improvement Software designed to be used and understood by everyone in any organisation.